
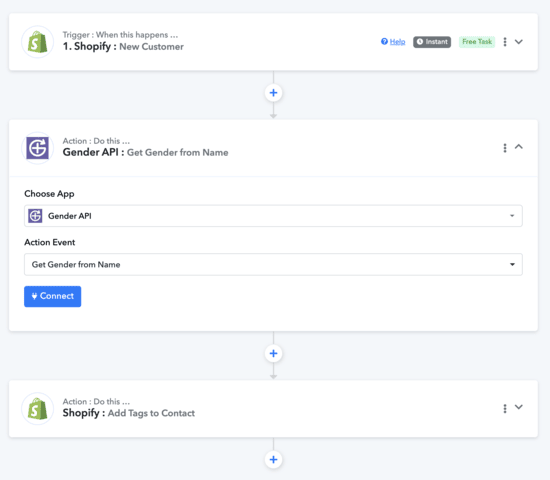
Automation map
Connect the trigger, enrichment and destination
Step-by-Step Guide to Using the GenderAPI Pabbly Integration
Step 1: Set Up a Trigger for New Customers in Shopify
Choose App: In the Pabbly Connect interface, select Shopify as the app for the trigger.
Trigger Event: Set the trigger event as New Customer. This event will initiate the workflow whenever a new customer is added to your Shopify store.
Follow Pabbly’s Webhook Instructions: Pabbly will provide instructions for setting up a webhook in Shopify. Simply follow the guidelines on the Pabbly platform to complete this setup.
Capture a test webhook: Use a representative test customer and inspect the captured Shopify fields before mapping any production data.
Step 2: Retrieve Gender Information Using GenderAPI
Choose App: Add a new action and select GenderAPI from the app list.
Action Event: Set the action event as Get Gender from Name. This step retrieves the gender information based on the customer’s name.
Connect: Click Connect and select your GenderAPI connection. If this is your first time, you’ll need to set up your connection by entering your API key.
Data Input: Make sure the customer’s name from Shopify is passed to GenderAPI for the gender determination process.
Step 3: Add Tags to Customer in Shopify
Choose App: Add another action and select Shopify from the app list.
Choose the Shopify destination action: Select the currently available customer-tag or update action, then add a filter so unknown or low-probability results are not assigned a definitive tag.
Connect: Click Connect and use your existing Shopify connection.
Map the reviewed output: Map only accepted result values to the chosen Shopify field or tag without overwriting unrelated customer data.
Step 4: Test Your Workflow
Create a representative Shopify test customer and confirm that Pabbly captures the intended webhook fields.
Inspect the GenderAPI response, including unknown and low-probability outcomes.
Verify that only the intended Shopify field or tag changes and that the error path leaves customer data untouched.
Enable the workflow only after these checks, then continue monitoring webhook failures, quotas and credits.
Configuration reference